Pre-requisites
- You will need Digital Theatre+ metadata, which you can request by completing the form at https://sso.digitaltheatreplus.com
- You will need to have access to the ClassLink SAML Console at https://idp.classlink.com/admin
- You will need to have access to the ClassLink LaunchPad Admin Console at https://launchpad.classlink.com/admin
Assumptions
Digital Theatre+ assumes that the SubjectNameId sent in the SAML response will have the syntax of an email address. If this is not the case, you can send an additional attribute with the email address of the user contained within it. See the last section of this page for details.
Step 1 - Add a new Service Provider
- Go to https://idp.classlink.com/admin
- Click Add new
- In the name field, enter: Digital Theatre+
- Instead of Metadata URL, click the "metadata xml" link underneath the field and copy/paste the contents of Digital Theatre+'s Service Provider Metadata XML file into the field.
- Save the IDP
- Copy the IdP Metadata URL
(example: https://idp.classlink.com/sso/metadata/XXXxxXx) - Send (a) the IDP Metadata URL by replying to the support email thread, or if you have not started the process, open a new request via https://sso.digitaltheatreplus.com
Digital Theatre+ will import this information into their system to establish the trust between your Identity Provider and the Digital Theatre+ Service Provider.
Step 2 - Set up an App in ClassLink
- Go to https://launchpad.classlink.com/admin
- Go to Applications > Add & Assign Apps
- Click Add
- Enter the Application details as follows:
- Application Name: Digital Theatre+
- Category: Education
- Sub-category: General education
- Single Sign-App App: Yes
- Web address: Insert the Digital Theatre+ ACS URL provided in Digital Theatre+'s Metadata (it will look like this, with the last part being the unique identifier for you: https://auth.digitaltheatreplus.com/sso/saml2/<your-unique-id-goes-here>)
- Privacy URL: https://edu.digitaltheatreplus.com/privacy-policy
- Terms of Service URL: https://edu.digitaltheatreplus.com/terms/
- Click Save
Step 3 - Assign the App to Users
- Go to https://launchpad.classlink.com/admin
- Applications > Add & Assign Apps
- Locate the entry for Digital Theatre+
- Click the Assign button in the Assign App Column
- Add the correct entities (these can be Profiles, Users, Organisations, Courses, so you will know which is right for you to use)
Optional - Configure additional attributes
Classlink provides the ability to map user information to attributes.
To do this, you will need to:
- Go to https://idp.classlink.com/admin
- Select the IdP configured for Digital Theatre+
- Select the Attributes to Add
- Most likely email will be needed, if it is not sent as the Subject Name ID.
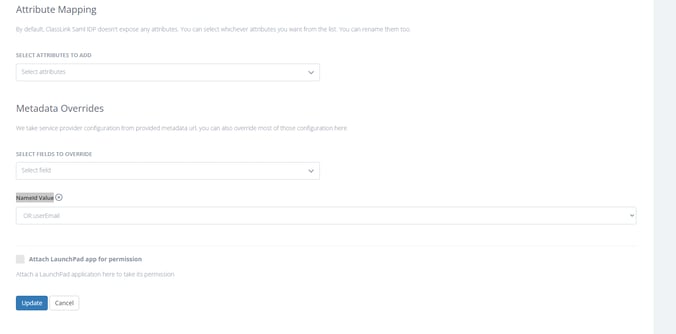
Optional - Metadata Override
If SubjectNameId isn't an email address you can override the value
- Access the SAML console link
- Click on the 3 dots at the far right of the Digital Theatre+ link and select Edit
- Scroll down to Metadata Overrides
- Click the dropdown for Select Fields to Override
- Select NameId Value and then a new dropdown line will appears
- Click the dropdown and choose a value which contains an email address for example OR:userEmail.
- Click Update